Senin, 03 Desember 2018

Kill Process MySQL

here I go with that trick:
  1. Login to MySql.
  2. run that query Select concat('KILL ',id,';') from information_schema.processlist where user='user';
  3. This will print all the process with KILL command.
  4. Copy all the query result, manipulate them and remove pipe. sign and paste all again into the query console. HIT ENTER.

Selasa, 06 November 2018

Install phpMyAdmin from Source

Install phpMyAdmin from Source

While it’s not recommended for production servers, because you have to manually ensure your install of phpMyAdmin is kept up-to-date, you can also install phpMyAdmin from source.

Step 1: Identify Apache’s DocumentRoot

We need to find Apache’s DocumentRoot so we know where to place our phpMyAdmin files:
In this case, we’ll need to put the phpMyAdmin files in /var/www/html.

Step 2: Download Latest Version of phpMyAdmin

The stable version of phpMyAdmin at the time this article was written: phpMyAdmin 4.3.11.1 (released 3/4/2015).
Visit the phpMyAdmin download page to grab the latest version of phpMyAdmin.
I ended up with a phpMyAdmin-4.3.11.1-english.tar.gz file in my /var/www/html directory.

Step 3: Unpack phpMyAdmin Files

Now rename the phpMyAdmin-4.3.11.1-english directory:
Remove the phpMyAdmin files:

Step 4: Secure /phpmyadmin Directory

We want to set up a specific user for our phpMyAdmin install.

Step 5: Update phpMyAdmin config.inc With Install Wizard

To use the phpMyAdmin install wizard, we first need to set up the config.inc file.

Step 6: Run phpMyAdmin Install Wizard

To begin the installation of phpMyAdmin, access the installation URL at:
http://example.com/phpmyadmin/setup/index.php
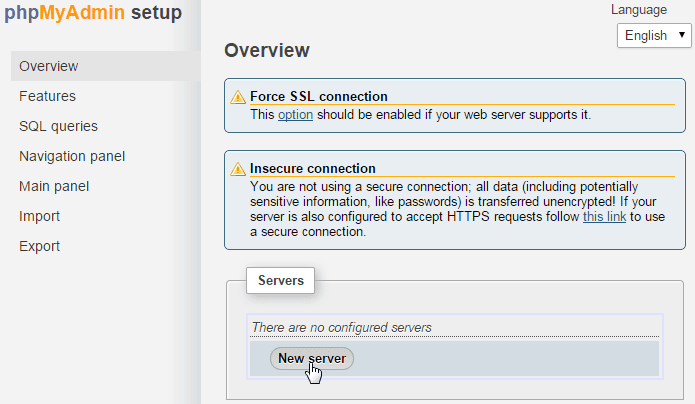
Under the “Servers” section, click on “New Server.”
phpMyAdmin Install from Source Click New Server
Under the “Servers” section, click on “New Server.”
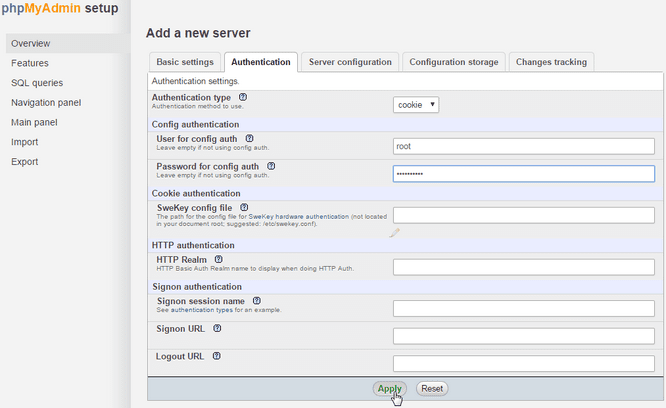
Under the “Authentication” tab, type in your MySQL root password in the “Password for Config Auth” box and then click “Apply.”
phpMyAdmin Install from Source Authentication Tab Enter root Password
In the “Password for Config Auth” box, type in your MySQL root password.
Remove the phpMyAdmin /config directory for security.
1
sudo rm -rf /var/www/html/phpmyadmin/config

Kamis, 02 Agustus 2018

Insert to MySQL from JSon

Contoh hasil JSon String adalah sebagai berikut :

{
    "value": 4168,
    "currency": "CREDITS",
    "expiredDate": "11-12-2018"
}

JSon diatas merupakan hasil dari : http://api.nusasms.com/api/command?user=xxx_api&password=xxx_api_password&cmd=CREDITS&output=json

Create database sms_quota pada MySQL untuk menyimpan data string tersebut
dengan tabel sebagai berikut :

quota_id, quota_tgl, quota_value, quota_currency, expiredDate

Create file cek_data.php

<?php

$host="10.201.x.x";
$username="jaxxx";
$password="xxxx";
$dbase="sms-xxx";

$connection = mysqli_connect($host,$username,$password,$dbase) or die("Error " . mysqli_error($connection));

//untuk mendapatkan file json contoh data dari API URL
$jsondata = file_get_contents('http://api.nusasms.com/api/command?user=xxx_api&password=xxx_api_password&cmd=CREDITS&output=json');

//convert json ke data array
$data = json_decode($jsondata, true);

$value = $data['value'];
$currency = $data['currency'];
$expired = $data['expiredDate'];

$sql = "INSERT INTO sms_quota(quota_tgl, quota_value, quota_currency, expiredDate)
VALUES(NOW(), '$value', '$currency', '$expired')";

if(!mysqli_query($connection, $sql)){
  die("Error insert data ");
}else{
  echo "Success insert data";
}

?>

untuk memanggil jalankan http://[alamat]/cek_data.php

Selesai.....

Rabu, 11 April 2018

Insert MySQL from other host with PHP

<?php

//fecth loop data kantor Host 1
$dBIP='10.xxx.xxx.x';
$dBADN='usr_xxxxx';
$dBPWD='pwd_xxxxx';
$dBDBS="xxxxx_db";

$CONNECTW=mysql_connect($dBIP,$dBADN,$dBPWD);
mysql_select_db($dBDBS, $CONNECTW)  or die("Can't connect to second database");


function createOtherConn($host, $uname, $pass, $db) {
$conn = new mysqli($host, $uname, $pass, $db);
          if (!$conn->connect_error) {
return $conn;
          } else {
return false;
          }
}

$query = mysql_query("SELECT kantor_host FROM data_kantor WHERE kantor_status = '1'");
// $start = 0;
while ($row = mysql_fetch_array($query)) {
//SELECT dari Host 2
$kantorConn = createOtherConn($row['kantor_host'], 'usr_xxx', 'xxx123!', 'sms');
      try{
if ($kantorConn) {
$sql = "SELECT dbase_register,dbase_kantor,dbase_kode,dbase_total
                             FROM temp_dbase";
$result = $kantorConn->query($sql);
if ($result->num_rows > 0) {
while ($rowData = $result->fetch_assoc()) {
$dbReg     = $rowData['dbase_register'];
$dbKantor = $rowData['dbase_kantor'];
$dbKode    = $rowData['dbase_kode'];
$dbTotal    = $rowData['dbase_total'];

$queryIns = mysql_query("INSERT INTO temp_dbase (dbase_register, dbase_kantor, dbase_kode, dbase_total) VALUES ('$dbReg', '$dbKantor', '$dbKode', '$dbTotal')");
if ($queryIns) {
echo sprintf('Fetch data %s sukses..', $row['kantor_host']);
echo "<br/>";

} else {
echo sprintf('Fetch data %s gagal.', $row['kantor_host']);
echo "<br/>";
}
}
} else {
echo "No data to print.";
}
} else {
echo sprintf('Koneksi ke %s gagal.', $row['kantor_host']);
}
}catch(Exception $e){
echo "error :". $e->getMessage();
}
$kantorConn->close();

// if ($start >= 10) {
// break;
// }
// $start++;
}

?>
Senin, 02 April 2018

Konfigurasi HTTPS pada Website Apache2 Ubuntu Server 14.04 | Self-Signed SSL

HTTPS adalah protokol website (http) yang sudah memiliki secure yang sangat terjamin dan membuat website lebih aman dari serangan hacker. HTTPS dibuat dan memerlukan sebuah SSL Certificate untuk mensecure port HTTP. dan SSL Certifikace tersebut kita harus membelinya jika untuk website yang sudah publik.

Namun jika kita ingin belajar menggunakan virtualbox atau hanya mengatasi rasa ingin tau maka cara ini bisa anda gunakan.Ingat!! Jangan gunakan cara ini untuk Publik website ya.

Membuat Private Key (Buatlah password jika diminta):


$ openssl genrsa -des3 -out server.key 1024

Buat certificate nya :

$ openssl req -new -key server.key -out server.csr

Hapus Passpharse dari key :

$ cp server.key server.key.org
$ openssl rsa -in server.key.org -out server.key

Buat self-signed ssl nya:

$ openssl x509 -req -days 365 -in server.csr -signkey server.key -out server.crt

Copy Certificate dan Key ke directory ssl apache2 :

$ cp server.crt /usr/local/apache/conf/ssl.crt
$ cp server.key /usr/local/apache/conf/ssl.key

Kemudian tambahkan ssl tsb ke VirtualHost yang ingin dibuat HTTPS , Letakkan script dibawah sebelum tag </VirtualHost> dan jangan lupa Port *:80 diganti dengan *:443

SSLEngine on
SSLCertificateFile /usr/local/apache/conf/ssl.crt/server.crt
SSLCertificateKeyFile /usr/local/apache/conf/ssl.key/server.key


Setelah itu restart apache anda :

$ a2enmod ssl
$ a2ensite default-ssl
$ service apache2 restart

Bukalah website anda dengan protokol https, Dan jangan lupa except certificate anda untuk bisa browse. Karna dianggap unsecure terhadap browser (karena self-signed SSL :D ):

https://www.domain.com